# 《Java极简设计模式》第14章:命令模式(Command)
作者:冰河
星球:http://m6z.cn/6aeFbs (opens new window)
博客:https://binghe.gitcode.host (opens new window)
文章汇总:https://binghe.gitcode.host/md/all/all.html (opens new window)
源码地址:https://github.com/binghe001/java-simple-design-patterns/tree/master/java-simple-design-command (opens new window)
沉淀,成长,突破,帮助他人,成就自我。
- 本章难度:★★☆☆☆
- 本章重点:用最简短的篇幅介绍命令模式最核心的知识,理解命令模式的设计精髓,并能够灵活运用到实际项目中,编写可维护的代码。
大家好,我是CurleyG~~
今天给大家介绍《Java极简设计模式》的第14章:命令模式(command),多一句没有,少一句不行,用最简短的篇幅讲述设计模式最核心的知识,好了,开始今天的内容。
# 一、概述
将一个请求封装为一个对象,从而可以用不同的请求对客户端进行参数化;对请求排队或记录请求日志,以及支持可撤消的操作。
# 二、适用性
1.抽象出待执行的动作以参数化某个对象。
2.在不同的时刻指定排列和执行请求。
3.支持取消操作。
4.支持修改日志,这样当系统崩溃时,这些修改可以被重做一遍。
5.用构建在原语操作上的高层抽象操作构造一个系统。
# 三、参与者
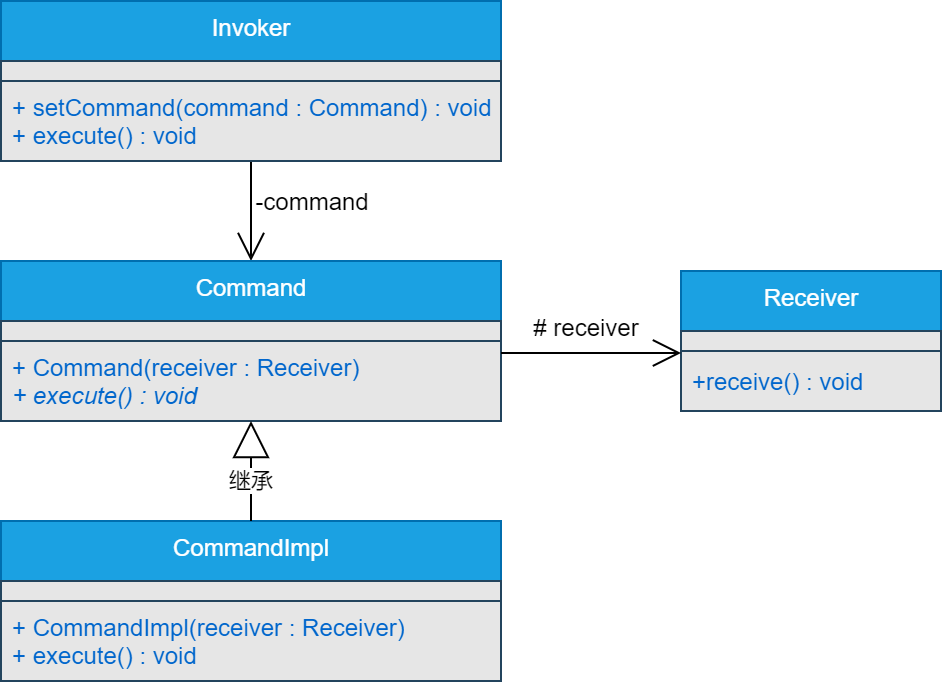
1.Command 声明执行操作的接口。
2.ConcreteCommand 将一个接收者对象绑定于一个动作。 调用接收者相应的操作,以实现Execute。
3.Client 创建一个具体命令对象并设定它的接收者。
4.Invoker 指定该命令执行某个请求。
5.Receiver 指定如何实施与执行一个请求相关的操作。任何类都可能作为一个接收者。
# 四、类图
# 五、示例
Command
/**
 * @author binghe(微信 : hacker_binghe)
 * @version 1.0.0
 * @description Command
 * @github https://github.com/binghe001
 * @copyright 公众号: 冰河技术
 */
public abstract class Command {

    protected Receiver receiver;

    public Command(Receiver receiver) {
        this.receiver = receiver;
    }

    public abstract void execute();
}
2
3
4
5
6
7
8
9
10
11
12
13
14
15
16
17
ConcreteCommand
/**
 * @author binghe(微信 : hacker_binghe)
 * @version 1.0.0
 * @description ConcreteCommand
 * @github https://github.com/binghe001
 * @copyright 公众号: 冰河技术
 */
public class CommandImpl extends Command{

    public CommandImpl(Receiver receiver) {
        super(receiver);
    }

    @Override
    public void execute() {
        receiver.receive();
    }
}
2
3
4
5
6
7
8
9
10
11
12
13
14
15
16
17
18
Invoker
/**
 * @author binghe(微信 : hacker_binghe)
 * @version 1.0.0
 * @description Invoker
 * @github https://github.com/binghe001
 * @copyright 公众号: 冰河技术
 */
public class Invoker {

    private Command command;

    public void setCommand(Command command) {
        this.command = command;
    }

    public void execute() {
        command.execute();
    }
}
2
3
4
5
6
7
8
9
10
11
12
13
14
15
16
17
18
19
Receiver
/**
 * @author binghe(微信 : hacker_binghe)
 * @version 1.0.0
 * @description Receiver
 * @github https://github.com/binghe001
 * @copyright 公众号: 冰河技术
 */
public class Receiver {

    public void receive() {
        System.out.println("This is Receive class!");
    }
}
2
3
4
5
6
7
8
9
10
11
12
13
Test
/**
 * @author binghe(微信 : hacker_binghe)
 * @version 1.0.0
 * @description 测试类
 * @github https://github.com/binghe001
 * @copyright 公众号: 冰河技术
 */
public class Test {

    public static void main(String[] args) {
        Receiver rec = new Receiver();
        Command cmd = new CommandImpl(rec);
        Invoker i = new Invoker();
        i.setCommand(cmd);
        i.execute();
    }
}
2
3
4
5
6
7
8
9
10
11
12
13
14
15
16
17
Result
This is Receive class!
好了,今天就到这儿吧,相信大家对命令模式有了更清晰的了解,我是冰河,我们下期见~~
← 第13章:责任链模式 第15章:解析器模式 →