# 《Java极简设计模式》第05章:原型模式(Prototype)
沉淀,成长,突破,帮助他人,成就自我。
- 本章难度:★★☆☆☆
- 本章重点:用最简短的篇幅介绍原型模式最核心的知识,理解原型模式的设计精髓,并能够灵活运用到实际项目中,编写可维护的代码。
# 一、概述
⽤⼀个已经创建的实例作为原型,通过复制该原型对象来创建⼀个和原型相同或相似的新对象。在这⾥,原型实例指定了要创建的对象的种类。⽤这种⽅式创建对象⾮常⾼效,根本⽆须知道对象创建的细节
# 二、适用性
1.当一个系统应该独立于它的产品创建、构成和表示时。
2.当要实例化的类是在运行时刻指定时,例如,通过动态装载。
3.为了避免创建一个与产品类层次平行的工厂类层次时。
4.当一个类的实例只能有几个不同状态组合中的一种时。
建立相应数目的原型并克隆它们可能比每次用合适的状态手工实例化该类更方便一些。
# 优点
- Java ⾃带的原型模式基于内存⼆进制流的复制,在性能上⽐直接 new ⼀个对象更加优良。
- 可以使⽤深克隆⽅式保存对象的状态,使⽤原型模式将对象复制⼀份,并将其状态保存起来,简化了创建对象的过程,以便在需要的时候使⽤(例如恢复到历史某⼀状态),可辅助实现撤销操作。
# 缺点
- 需要为每⼀个类都配置⼀个 clone ⽅法clone ⽅法位于类的内部,当对已有类进⾏改造的时候,需要修改代码,违背了开闭原则。
- 当实现深克隆时,需要编写较为复杂的代码,⽽且当对象之间存在多重嵌套引⽤时,为了实现深克隆,每⼀层对象对应的类都必须⽀持深克隆,实现起来会⽐较麻烦。因此,深克隆、浅克隆需要运⽤得当
# 代码实现
原型模式实现对象克隆有两种形式:浅克隆与深克隆
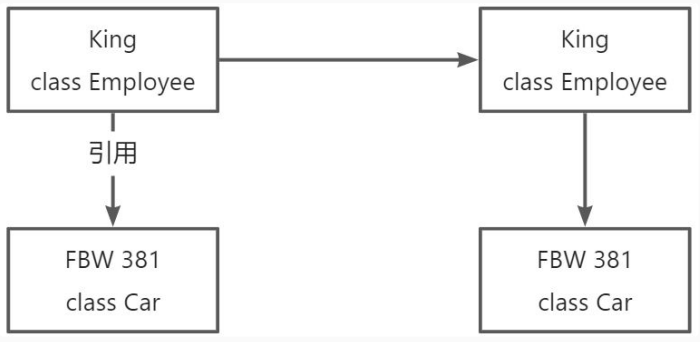
# 浅克隆
浅克隆:创建⼀个新对象,新对象的属性和原来对象完全相同,对于⾮基本类型属性,仍指向原有属性所指向的对象的内存地址。

public class Car {
 public String number;

 public String getNumber() {
 return number;
 }

 public void setNumber(String number) {
 this.number = number;
 }
}
1
2
3
4
5
6
7
8
9
10
11
2
3
4
5
6
7
8
9
10
11
被复制的对象需要实现Clonable接⼝与clone()⽅法
public class Employee implements Cloneable{
 private String name;
 private Car car;
 public String getName() {
 return name;
 }
 public void setName(String name) {
 this.name = name;
 }
 public Car getCar() {
 return car;
 }
 public void setCar(Car car) {
 this.car = car;
 }
 //重写Clone⽅法
 @Override
 protected Object clone() throws CloneNotSupportedException {
 System.out.println("正在复制Employee对象");
 return super.clone();
 }
}
1
2
3
4
5
6
7
8
9
10
11
12
13
14
15
16
17
18
19
20
21
22
2
3
4
5
6
7
8
9
10
11
12
13
14
15
16
17
18
19
20
21
22
应用入口:
public class App {
 public static void main(String[] args) throws CloneNotSupportedExcepti
on {
 Employee king = new Employee();
 king.setName("King");
 Car car = new Car();
 car.setNumber("FBW 381");
 king.setCar(car);
 Employee cloneKing = (Employee)king.clone();
 System.out.println("King == CloneKing:" + (king == cloneKing));
 System.out.println("King.car == CloneKing.car:" + (king.getCar() =
= cloneKing.getCar()));
 }
}
1
2
3
4
5
6
7
8
9
10
11
12
13
14
2
3
4
5
6
7
8
9
10
11
12
13
14
执行结果
正在复制Employee对象
King == CloneKing:false
King.car == CloneKing.car:true
1
2
3
2
3
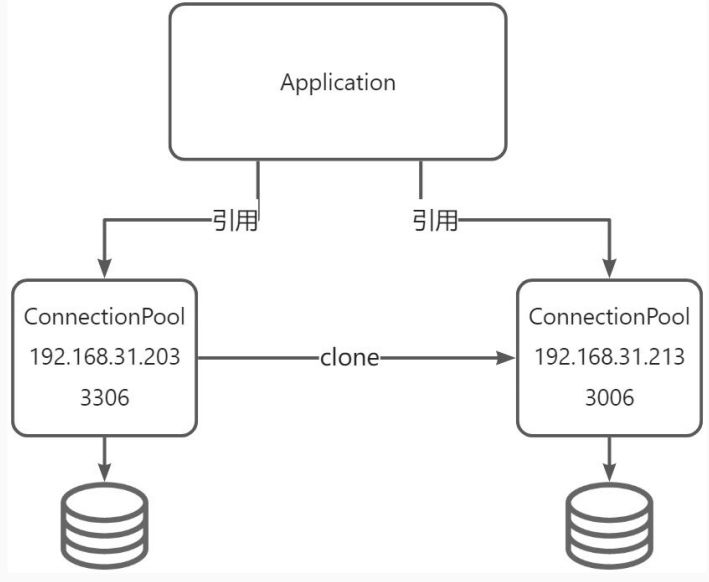
# 深克隆
深克隆:创建⼀个新对象,属性中引⽤的其他对象也会被克隆,不再指向原有对象地址
Car代码完全相同,省略
基于Json实现对象深度Clone,不再需要实现Clonable接⼝与clone()⽅法
import com.google.gson.Gson;
public class Employee{
 private String name;
 private Car car;
 public String getName() {
 return name;
 }

 public void setName(String name) {
 this.name = name;
 }

 public Car getCar() {
 return car;
 }

 public void setCar(Car car) {
 this.car = car;
 }
 //基于JSON实现深度序列化
 public Employee deepClone(){
 Gson gson = new Gson();
 String json = gson.toJson(this);
 System.out.println(json);
 Employee cloneObject = gson.fromJson(json, Employee.class);
 return cloneObject;
 }
}
1
2
3
4
5
6
7
8
9
10
11
12
13
14
15
16
17
18
19
20
21
22
23
24
25
26
27
28
2
3
4
5
6
7
8
9
10
11
12
13
14
15
16
17
18
19
20
21
22
23
24
25
26
27
28
public class App {
 public static void main(String[] args) throws CloneNotSupportedExcepti
on {
 Employee king = new Employee();
 king.setName("King");
 Car car = new Car();
 car.setNumber("FBW 381");
 king.setCar(car);
 Employee cloneKing = (Employee) king.deepClone();
 System.out.println("King == CloneKing:" + (king == cloneKing));
 System.out.println("King.car == CloneKing.car:" + (king.getCar() =
= cloneKing.getCar()));
 }
}
1
2
3
4
5
6
7
8
9
10
11
12
13
14
2
3
4
5
6
7
8
9
10
11
12
13
14
{"name":"King","car":{"number":"FBW 381"}}
King == CloneKing:false
King.car == CloneKing.car:false
1
2
3
2
3
# 应⽤场景
- 对象之间相同或相似,即只是个别的⼏个属性不同的时候。
- 创建对象成本较⼤,例如初始化时间⻓,占⽤CPU太多,或者占⽤⽹络资源太多等,需要优化资源。
- 创建⼀个对象需要繁琐的数据准备或访问权限等,需要提⾼性能或者提⾼安全性。
- 系统中⼤量使⽤该类对象,且各个调⽤者都需要给它的属性重新赋值。
# 三、参与者
1.Prototype 声明一个克隆自身的接口。
2.ConcretePrototype 实现一个克隆自身的操作。
3.Client 让一个原型克隆自身从而创建一个新的对象。
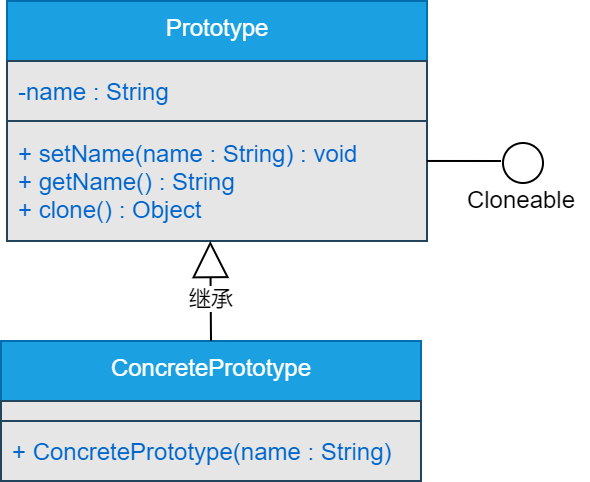
# 四、示例一
Prototype
/**
 * @author binghe(微信 : hacker_binghe)
 * @version 1.0.0
 * @description 原型类,实现Cloneable接口
 * @github https://github.com/binghe001
 * @copyright 公众号: 冰河技术
 */
public class Prototype implements Cloneable{

    private String name;
    public void setName(String name) {
        this.name = name;
    }
    public String getName() {
        return this.name;
    }
    public Object clone(){
        try {
            return super.clone();
        } catch (Exception e) {
            e.printStackTrace();
            return null;
        }
    }
}
1
2
3
4
5
6
7
8
9
10
11
12
13
14
15
16
17
18
19
20
21
22
23
24
25
2
3
4
5
6
7
8
9
10
11
12
13
14
15
16
17
18
19
20
21
22
23
24
25
ConcretePrototype
/**
 * @author binghe(微信 : hacker_binghe)
 * @version 1.0.0
 * @description 原型类的子类,用于构建原型
 * @github https://github.com/binghe001
 * @copyright 公众号: 冰河技术
 */
public class ConcretePrototype extends Prototype {

    public ConcretePrototype(String name) {
        setName(name);
    }
}
1
2
3
4
5
6
7
8
9
10
11
12
13
2
3
4
5
6
7
8
9
10
11
12
13
Client
/**
 * @author binghe(微信 : hacker_binghe)
 * @version 1.0.0
 * @description  测试类
 * @github https://github.com/binghe001
 * @copyright 公众号: 冰河技术
 */
public class Test {

    public static void main(String[] args) {
        Prototype pro = new ConcretePrototype("prototype");
        Prototype pro2 = (Prototype)pro.clone();
        System.out.println(pro.getName());
        System.out.println(pro2.getName());
    }
}
1
2
3
4
5
6
7
8
9
10
11
12
13
14
15
16
2
3
4
5
6
7
8
9
10
11
12
13
14
15
16
result
prototype
prototype
1
2
2
← 第04章:建造者模式 第06章:适配器模式 →